
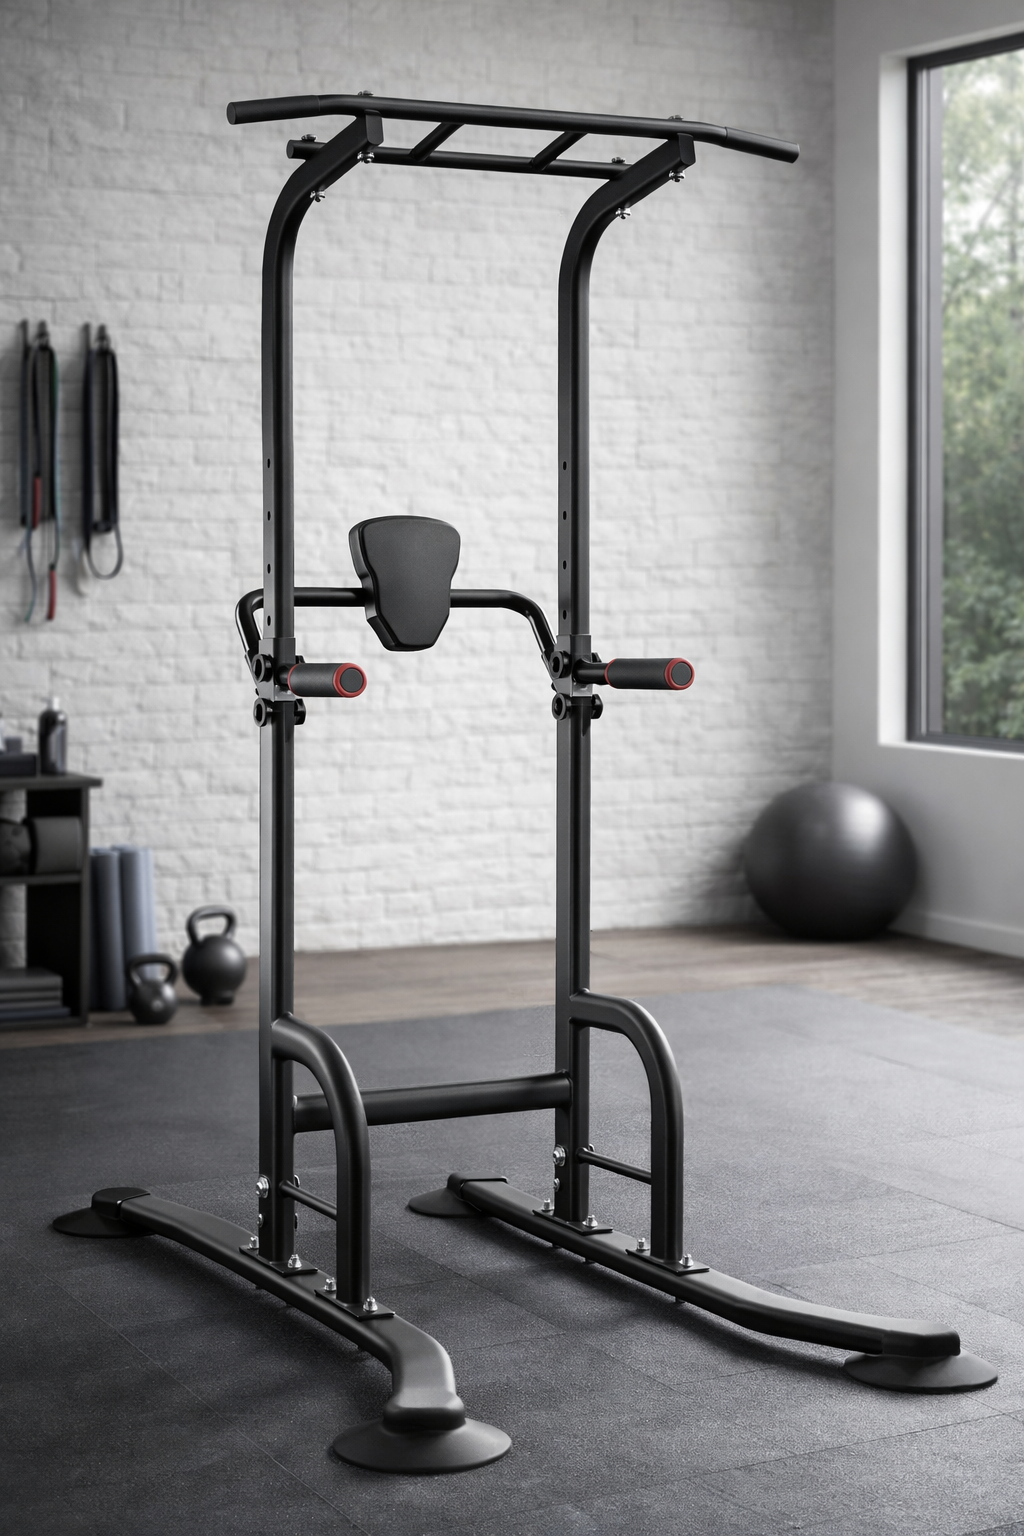
How to Use a Power Tower for a Full Body Workout
As an Amazon Associate I earn from qualifying purchases. Some links in this post go to Amazon and may earn me a small commission at no extra cost to you.
Last Updated on August 30, 2026 by Smarteryouu
⭐How to Use a Power Tower for a Full Body Workout
A power tower is the one piece of home equipment that earns its floor space, and I say that as someone who uses one most weeks. Mine is mainly for back and shoulders, which is the work that bodyweight training on the floor never quite reaches. Using a power tower for a full body workout means understanding that it is really four pieces of equipment welded together, and that each one asks something different of you. Most people buy one, do a few pull ups badly, and never touch three of the four stations. This guide goes through all of them, with an honest progression for anyone who cannot yet do a single pull up, because that is where most people actually start. I have been exercising for over a decade and the frame in my house is still the thing I use most.

⭐ What Can You Actually Do on a Power Tower?
A power tower has four stations. The bar at the top for pull ups and chin ups, the dip handles for chest and triceps, the padded arm rests for knee and leg raises, and the low handles at the base for push ups. Between them they cover almost everything above the waist.
What it does not cover is your legs. No power tower gives you a squat or a deadlift, so if legs matter to you, they need their own plan elsewhere. Calling it full body is fair only because the four stations together reach nearly everything else.
The two stations people ignore are the arm rests and the push up handles. That is a shame, because the arm rests are the best core station most people will ever own, and the low handles make push ups considerably kinder on the wrists.
If you are working out whether a frame like this belongs in your space at all, our home exercising page is the wider view on setting up at home.
⭐ Pull Ups and Chin Ups, the Reason to Own One
These are why the frame is worth having. Nothing else you can do at home trains the back the way hanging from a bar does, and the back is the half of the body that desk life quietly neglects.
The difference between the two grips is simple. Palms facing away is a pull up, and it puts more of the work on your back and shoulders. Palms facing you is a chin up, and it brings your biceps in, which makes it noticeably easier. Beginners should start with chin ups.
Start each rep from a dead hang with your arms straight, and pull until your chin passes the bar. Lower yourself all the way back down under control rather than dropping. Half a rep done properly beats a full one done with a swing.
The most common mistake is kicking the legs to generate momentum. It gets you over the bar and teaches you almost nothing. Cross your ankles behind you and keep them still, and the number of reps you can do will drop honestly to where it actually is.
⭐ How Do You Do a Pull Up If You Cannot Do One Yet?
Use negatives. Step onto a chair so your chin is already above the bar, take your feet off, and lower yourself as slowly as you can, aiming for five seconds. Do three to five of those. Most people build their first full pull up from negatives faster than from any other method.
A resistance band is the other route. Loop it over the bar, put one knee or one foot into it, and it gives you a push at the bottom where the movement is hardest. Move to a lighter band as you get stronger rather than doing more reps with the same one.
You can also just hang. Thirty seconds from a dead hang, two or three times, builds the grip and the shoulder stability that a pull up needs. Grip is what fails first for most beginners, long before the back does.
Give this six to eight weeks rather than two. A first pull up is a genuinely significant thing to build, and the people who get there are the ones who kept doing negatives twice a week while nothing appeared to be happening.
⭐ Dips, and How Far Down to Go
Dips work the chest, the front of the shoulders and the triceps, and they are the hardest station on the frame for most beginners. They are also the one where going too deep causes problems.
Lower until your upper arms are roughly parallel with the floor, then press back up. Going deeper than that puts the front of the shoulder in a position it does not enjoy, and there is no extra benefit waiting down there.
Leaning your chest forward slightly puts more work into the chest. Staying upright puts more into the triceps. Neither is wrong, so pick whichever you are trying to train and stay consistent within a set.
To make them easier, keep your toes on the floor and take some of your weight through your legs. That is a proper regression, not a compromise, and it lets you learn the path of the movement before you carry your whole body through it.
⭐ The Knee Raise Station, and Why It Is Harder Than It Looks
Rest your forearms on the pads, hold the handles, and let your legs hang. Then lift your knees toward your chest and lower them slowly. It looks like the easy station and it is not.
The whole movement lives in the lowering. Almost everyone lifts their knees well and then lets them fall, which skips the half that does the work. Take three seconds to bring them down and five repetitions will be plenty.
Watch for swinging. If your body starts moving back and forth like a pendulum, you are using momentum rather than your middle. Pause at the bottom with your legs completely still before starting the next one.
Straight legs are the harder version, and they are worth earning rather than rushing. When bent knee raises feel easy for ten slow repetitions, straighten your legs a little at a time rather than going from bent to straight in one jump.
⭐ How Often Should You Use a Power Tower?
Two or three sessions a week, with a rest day between them. Pulling and pushing your own body weight is demanding work, and the strength is built while you recover rather than while you train. Daily use is the most common reason beginners stall.
Twenty minutes is a full session. Two or three rounds of a pulling movement, a pushing movement and a core movement covers everything the frame is for, and there is no need to make it longer.
Your hands will complain before your muscles do. Blisters in the first fortnight are almost guaranteed, and the fix is to stop the set when your grip goes rather than pushing through and tearing skin. It settles within a month.
On the days between sessions, keep moving gently rather than doing nothing. Our gentle exercises to do before bed suit a rest day well, and our morning routine for beginners works the same way.
⭐ A Beginner Routine and Where It Goes Next
Start with one pulling movement, one pushing movement and one core movement. That is the whole template, and every stage below is the same three slots filled with harder versions.
In the first month, do three pull up negatives, then dips with your toes down for six repetitions, then five slow bent knee raises. Two rounds, twice a week. That is a complete session and it will feel like enough.
Once negatives feel controlled, swap them for band assisted chin ups and add a third round. Dips come off the floor, and the knee raises get slower rather than more numerous. This stage usually lasts a couple of months and there is no need to hurry it.
After that, unassisted chin ups become pull ups, dips go to full depth, and knee raises straighten toward leg raises. That is the whole progression, and it is the same three slots the entire way. If finding the time is the harder problem, our post on easy routines for busy people helps with that side of it.
⭐ Where Should You Put a Power Tower?
Put it against a solid wall on a hard level floor, with roughly thirty centimetres of clearance above the bar when you are hanging, and enough room to swing your legs forward. Check your ceiling height before buying, since most towers stand around two point two metres tall.
Carpet is the usual problem. A tall frame on a soft floor rocks slightly on every rep, which feels alarming and is genuinely less safe. A thick equipment mat underneath fixes it and protects the floor at the same time.
Check the bolts after the first week and then every few months. Everything settles once you have been swinging your body weight around on it, and a frame that has started to wobble is almost always just a loose bolt rather than a fault.
Think about noise if anyone lives below you. A mat helps, and so does lowering yourself under control rather than dropping off the bar, which is the single loudest thing you will do on it.
⭐ Best Sellers
Top Products and Picks
These four are what actually get used with a frame like this, in the order you will want them.
- A power tower with adjustable height and a wide base. Height adjustment matters if anyone else in the house will use it, and a wide base is what stops the rocking. Check the stated user weight limit against your own before choosing.
- A set of heavy resistance bands. Buy these at the same time as the frame if you cannot yet do a pull up, because they are what gets you there. A set with three or four strengths lets you step down gradually as you improve.
- A thick equipment mat for underneath. Essential on carpet or over a room below, and worth it on hard floors too. It kills most of the wobble and all of the marking.
- Padded pull up grips or gloves. For the first month, when your hands give out before your back does. Plenty of people stop needing them by week six, but they are the difference between training and waiting for blisters to heal.
⭐ Final Thoughts
A power tower rewards patience more than almost any other piece of home equipment. The first month is mostly negatives and half repetitions, and then one day you get to the top of the bar without help and the whole thing makes sense.
Use all four stations rather than just the bar. The arm rests in particular are the best core work most people have access to at home, and they sit unused on the majority of frames.
Twice a week is enough. This is hard work for your joints and your grip as well as your muscles, and the progress arrives on the rest days rather than during the sessions.
Mine still gets used mainly for back and shoulders, which is what it is best at, and after more than a decade of training it remains the one piece of equipment in the house I would replace immediately if it broke. There is more across Smart Living Essentials.
⭐ Additional Resources
The Canadian Society for Exercise Physiology sets out how strength work fits alongside everything else in its 24 hour movement guidelines, which cover activity, sitting time and sleep by age group.
For how much activity is generally recommended each week, the World Health Organization publishes a fact sheet on physical activity that gives the numbers without prescribing a program.